Registers - Complete Guide
Registers are added to each session so you can record attendance. This guide will provide you with instructions for adding registers to Sessions. If you need guidance on adding sessions please refer to the Sessions guide.
- Adding a Register
- Submitting Registers
- Register icons
- Sessions Grid
- Deleting and Removing individuals from Registers
- Upshot Mobile App
- Bulk Importing Sessions and Registers
- Key Terms
Adding a Register
To add a register, select the relevant project from the Performance report section on the home screen or from Projects. Once you are in the project click on Sessions List.

The icon to the right of each session indicates the status of the register:


Draft registers do not count towards your statistics until they are submitted. Once a session with a draft register is in the past the session will appear with an exclamation mark as unsubmitted. You can edit a draft or submitted register at any time.
Use the filters on the right-hand side of the session list to help you find the relevant session. Once you have located the relevant session, click Add register.

When you click Add register you will be presented with two options, Start with an empty register and Copy attendees from another register.
Note: Copy attendees from another register will only appear if there are existing registers within the project.

Registers can also be added and managed using the Upshot Mobile App.
Starting with an empty register
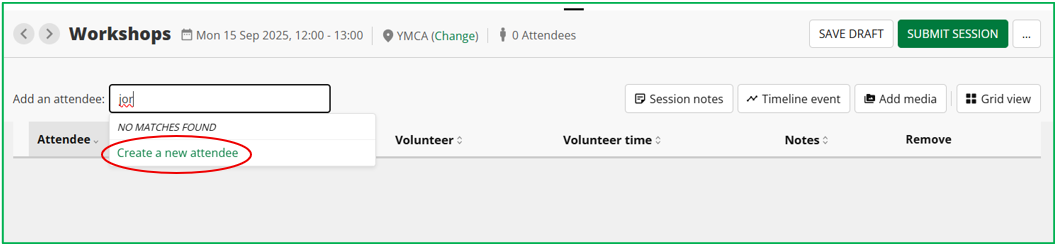
Choosing this option will take you straight through to a blank register. From here you can search for the name of an attendee you want to add to the register in the Add an attendee bar. Click on their name to add them to the register. Repeat this process for every attendee.
If the person you are looking for is not on the system when you search for them, you can click on the Create a new attendee button from within the search bar. This will add them onto the register and to the system, so you will not need to enter all their details again.
Copy attendees from an existing register
If you choose to copy attendees from an existing register you will be given two options:
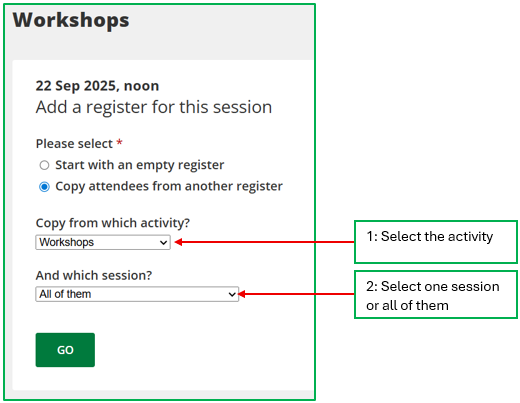
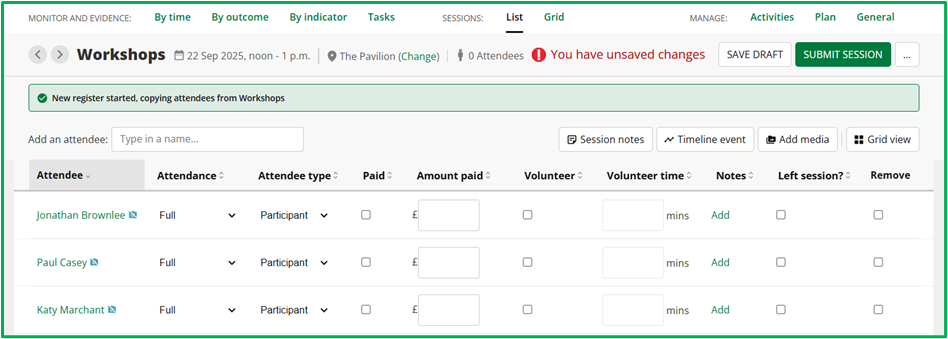
Once you click GO, attendees from the copied sessions will be added to the register. You can still add existing attendees to a copied register or remove attendees from the list.
Submitting Registers
Within a register you will find a variety of built in columns where you can add OPTIONAL extra detail about an attendee for that particular session. Users with the System Admin role can also create custom register fields to capture further data related to each participant.
For more information about configuring the default register fields and creating custom register fields, see our guide here.

These additional optional columns can be reported on via the Attendance Report, by amending the option under 'Data to display' before exporting the report.
Register icons

A camera with a line through, shown against an attendee's name, indicates that the organisation does not have photo or other media consent for this attendee.

A orange asterisk, shown against an attendee's name, indicates the attendee has a medical condition. Note this icon is based on the default Medical Conditions fields, whether a selection is added from the 'Specific Medical Conditions' drop-down - other than 'No known medical conditions' - or the free text box 'Any other medical conditions'.
Note: If these default fields are not currently displayed on your account a System Admin can amend this by going to Admin > Data Display options. More on this here.
Additional Register Tools

Grid view: This will take you to the Session Grid where you can manage multiple session registers for the same activity more quickly.
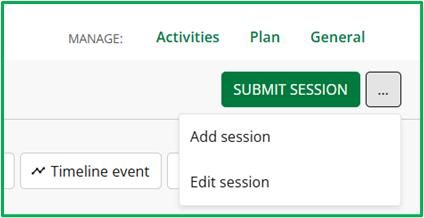
Further options can be accessed via the menu button next to the submit session
Edit Session: This allows you to change any of the details of the session including Date, Time, Duration, Title, Location, Type and Registrar.
Sessions Grid
The Sessions Grid is a quicker way of adding multiple registers at once. The Grid displays all of your sessions for an activity along the top of the page, and all the attendees that have ever attended that activity down the left-hand side. You can switch between activities in the top right-hand corner of the page by selecting Switch to another register.


Adding Sessions, Media and Downloading the Sessions Grid
You can add new sessions directly from the Sessions grid page and you can add media to the Activity (rather than a specific session).

Note – It is possible to edit a register after it has been submitted. To edit a register, click Edit register and then re-submit/save the register. Users can also edit via the 'Grid' by ticking/unticking the relevant names and clicking 'Submit'.

Deleting and Removing Individuals from Registers
To remove individuals from registers simply click on the remove tick box in line with their name. When ticked, the row for that attendee will turn red to indicate that they will be removed from the register when the register is resubmitted.
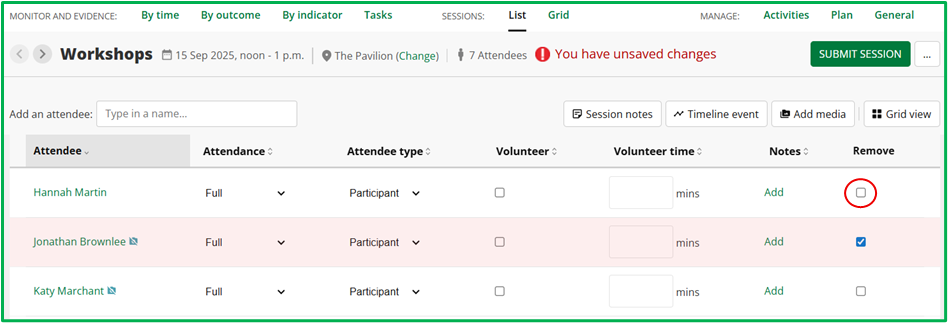

Note: All individuals must be removed from a session to allow you to delete the session itself.
Upshot Mobile App
Registers can also be added and managed using the Upshot Mobile App.
To access go to app.upshot.org.uk/mobile on your device and log in as normal.
You can then save this as an icon to your device home screen for quicker access in the future.
Note: Do not need to go to the App/Play Store to download, this is accessed via your normal web browser.
To find out more please refer to the Upshot Mobile App guide.

Bulk Importing Sessions and Registers
It is also possible to carry out a process to bulk import session and register data.
In the majority of instances the existing methods of data entry mentioned above will be simpler and quicker for users and organisations to complete.
More about this can be found here.
Key Terms
Activities:
These are the different things you deliver within each project such as classes, workshops, events, forums, groups, etc. These are often the physical outputs in your programme.
Attendee:
This is a participant, someone who accesses your services. You track your work with attendees through session registers, timeline events, media and surveys.
Sessions:
These are individual occurrences of an activity. You specify the date, time, duration and location of each session.
Registers:
Registers are added to each session so you can record attendance. You can choose to record the names of people that attend or use a head count register.
The examples shown in this guide are for a traditional register, allowing you to record the names of all the attendees at a particular session. It also allows you to define the attendee type (e.g. participant, session leader, support worker etc.), whether the attendees have paid for the session, whether they volunteered and how they volunteered. This extra information enhances your reporting capability.