Sessions - Complete Guide
Once you have created an Activity, you are ready to start adding Sessions.
Upshot defines a session as an individual occurrence of a specific activity, for example - an activity may be entitled ‘Cover letter writing’ and a session will be added for each individual time ‘Cover Letter Writing’ takes place. This step by step guide will explain how to add, view and edit sessions.
- Adding Sessions
- Session details
- Save and Add Register
- Creating Multiple Sessions
- Recurring Sessions
- Viewing, Editing and Deleting Sessions
- Calendar
- Sessions Abandoned
- Key Terms
Adding Sessions
As shown in the Activities guide, you can immediately add a session once you have created an activity by selecting the SAVE AND ADD SESSION button. However, you can also add sessions at any time from the Activities page. This can be directly accessed by clicking Activities from within a project.


Sessions are added to an activity using the Add sessions button. This button will direct you to the Add sessions form.
Session Details
It is important to note that all required fields are indicated by a red asterix *. You will not be able to create a session without completing the required fields.

2.Title (Optional): Enter a session title. This is just an optional reference that can be added for a specific session that might be helpful for users to refer back to. The 'Title' is not reportable. Examples of this might include:
- Cricket is the activity being delivered but the title of the specific session is 'Bowling'.
- Healthy Eating Workshops is the activity being delivered but the title of the specific session is 'Healthy Baking Swaps'.
5. Type: Register or Head count
6. Registrar: Select the session registrar of the sessions. This is the person who will record the register, for example a coach or session leader.
7. Add tags: Add any tags that will help you report or filter sessions. Tags can be separated by a comma. For instance, you could tag a basketball session with the different skills you covered such as dribbling, passing and/or shooting. More information about 'Tags' can be found here.
8. Add session information: You can input additional information for your attendees e.g. logistics, directions, etc if your calendar is shared externally. Alternatively use this to provide session leaders with additional information for the session ahead, such as what equipment is needed.
9. Copy: You can copy sessions, this allows you to add lots of regular sessions at once. See the Creating multiple sessions section below.
10. Add recurring sessions: You can create recurring sessions, this allows you to add as many sessions as you would like at specific intervals. See the Recurring sessions section below.

Save and Add Register
When creating a single session, you get the option at the bottom of the page to Save and Add Register.

Creating Multiple Sessions

However, if you have recurring sessions that take place at the same time and day each week you can easily use the Copy button to create identical sessions.


Recurring Sessions

Viewing, Editing and Deleting Sessions
Viewing & Editing Sessions
Under the All tab there is the option to filter by a custom date range.

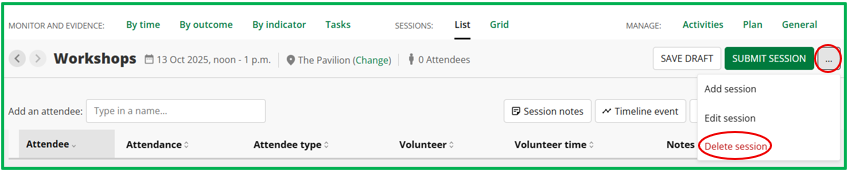
You can also edit a session at any time from the list by clicking on Edit session.
Editing a session allows users to make changes to things such as the date, time and duration of the session.
Whilst this page also presents the ability to move the session and associated details, such as register or head count, and any session notes to a different Activity within the same Project. Note, any Media or Timeline Events associated to the original session would need to have their associations amended manually.

Editing Sessions can be done on mass via the Edit draft sessions page, accessible via the Activities tab.

Note: If a register / head count has been added, this must be 'removed' first if you want to delete the session. For 'Register' sessions more about this can be found here. For more about deleting 'Head Count' sessions please refer to this guide.
You can also delete multiple sessions at a time by going to Edit Draft Sessions next to your Activity name.

From here you can remove multiple sessions (with no registers or head counts submitted) at once.
Note: This page will also include any 'abandoned and not counted' sessions.
This can either be done for individual sessions by ticking the Remove? tick box and then clicking Save.

Alternatively, users can select one of the two options near the top of the screen.

1. To check all the 'Remove?' tick boxes at once, users can click on the Remove? > All button on the left-hand side. This can be helpful if users have a long list of sessions they would like to remove, and they can then just untick the few they want to keep before hitting Save at the bottom.
2. If all sessions need to be removed and none need to be kept, clicking the REMOVE ALL button in red on the right-hand side will be the quickest way to do this. Selecting this button brings up a confirmation message for users confirming they want to remove all the sessions listed.
Calendar
Through your Sessions List you can also choose to view all sessions using the Calendar, and by clicking on a session you can view the session details. The calendar has views for the day, week or month.


Clicking on the Directions will lead to Google Maps.
When creating or editing existing sessions users can also choose to Add session information. This can be used to provide additional details for your attendees/session leaders on things such as logistics or directions, this can then be seen by potential participants if the calendar is shared externally.
To ensure the sessions are shown on the public facing version of the calendar, please ensure the box below is ticked when creating or editing a session.

If you want to share a live link to this calendar publicly, you can copy the link from the Tools section in the calendar view highlighted above. This can enable potential participants to know upcoming sessions taking place. The view of the calendar will be external from Upshot.

Sessions Abandoned


More about the choices when abandoning sessions and how to report on these can be found here.
Session Tags
An optional feature when adding or editing sessions is to add 'Tags'.
These can be useful in instances when you want to categorize or identify different types of sessions, or elements of sessions, within the same activity.
More detail can be found in the Session Tags guide.
Next Step
The next step is to add registers to your sessions. For more information on adding registers please refer to the Registers guide.