Duplicates
In some instances users may find multiple versions of the same attendee profile have been added to their Upshot account, this should be avoided for reporting purposes. Only one version of each attendee is needed on Upshot, as this attendee can then be added to all areas of the system.
This guide explains how the built-in duplicate checker works, give some additional tips on how to prevent duplicates in the first instance and how to resolve the issue if users find duplicates on their account.
- Duplicate checker
- Tips to help prevent duplicates
- Identifying duplicates
- Resolving (Merging) duplicates
Duplicate checker
Upshot has an inbuilt duplicate checker that can flag up potential duplicates when new attendees are added or existing attendee profiles are updated.
The starting point for this is cross-referencing the First name or Nickname and Gender of an attendee. This is why these fields are required by default and cannot be changed. This minimum amount of information is needed as a starting point to allow the system to flag potential duplicates for you.
Note that Gender does provide the option of prefer not to say and not provided.
The duplicate checker also looks across the following Upshot default fields - D/O/B, Postcode, Email and Mobile number.
These criteria will be queried if this data is provided for both attendees. For example, a potential duplicate will be highlighted if another attendee is found that:
- Has the same first name or nickname
- And has the same last name (if they have one)
- And has the same Gender
- And has the same postcode or DoB or email or mobile
- And has the same postcode and DoB (when both used)
It is important to appreciate that the absence of some of the above data on one of the profiles or the potential for human error in terms of spelling or replicating the information off a paper registration form onto the system can cause the duplicate checker to not recognise potential duplicate profiles.
To avoid instances of this an effective starting point before adding any new attendee either via inputting the information off a paper registration form or the external attendee sign up form can be using the search bar in the top right-hand corner of the account to see if the attendee already exists.
Attendees can be searched by various criteria, not only their name, please see the guide here for more detail.
Note that any custom data fields are not used in the duplicate checker process.
Note the duplicate checker also checks across any archived attendees. These attendees may need unarchiving.
Duplicate Warning
If the system recognises that this attendee may be a potential duplicate it will bring up one of the following two messages, dependent on the method of adding this attendee profile.
If the attendee is being added through People > Add new the following message will appear.
Please ensure you check the profile highlighted before clicking Continue to add this new profile to the system.
The Cancel button will not add a new profile and will just leave the user on the Add Attendee page.
 If potential duplicates are flagged on the Attendee sign up waiting list they will be marked with a red exclamation mark.

If users click on the red exclamation mark next to the attendee's name this can allow them to see this attendee's information alongside the existing attendee's on the account, which can be helpful to determine whether or not this truly is a duplicate. There are also links available to edit the attendee either on the waiting list or already within the system.
Tips to help prevent duplicates
The first step is to ensure all users at your organisation understand the importance of not having duplicates on your Upshot account and recognising what the above duplicate checker notifications mean. Having all users aware and engaged in this process can be a really effective step in stopping additional duplicates being added to the account.
As mentioned earlier if this does seem to be an issue for your organisation an effective starting point before adding any new attendee can be using the search bar in the top right-hand corner of the account to see if the attendee already exists, this will avoid issues with any instances where the duplicate checker has been unable to recognise potential duplicates.
Note: Within the search bar, the ordering of names is determined by: First Name, then Last Name, then Nickname, then ID. If a First Name, Last Name and Nickname all match then the most recently created attendee will appear first in the search bar.
Following on from this the most common example of why duplicate profiles exist come from a lack of data on the attendee profiles. Minimal information on attendees does not allow the system or users to recognise that two profiles are necessarily the same individual.
This may be caused by organisations receiving partially completed registration forms or users looking to add new attendees to Upshot quickly and so only inputting minimal information about them.
To avoid this it is recommended organisations look to make more fields on their registration form required. This can be done by a System Admin under the data display options. This can help to ensure that certain information is collected on participants, helpful for consistency in your reporting later, but also ensure that the system has more fields to check for potential duplicates and that users cannot enter very limited information when adding attendees.
This is where the external Attendee Sign-up form can be particularly helpful. Compared to a paper form where attendees may not complete much information, organisations using the electronic registration form can make certain fields required, ensuring that the attendee has to complete those fields before being able to submit the form.
Making one or two extra fields such as Last name, or Email address required can help to make a difference here.
In addition, using the Attendee sign-up form and moving the registration process online can help to remove errors made when trying to read/understand handwriting in terms of what has been input on a paper-based form onto Upshot.
Finally, organisations might find it helpful to use the Attendee Profile Picture feature as a way to verify existing profiles or between two profiles of the same name.

Identifying Duplicates
Whilst individual duplicates might be highlighted by users while going about tasks on the system, at other times you may want to review or identify all the potential duplicates on your account. In order to help users to carry this out, we have created a template Duplicate Checker to identify possible duplicates within your account through the use of the People Report.
You can download the Duplicate Checker template here. Before opening the download of the template, you may need to "unblock" the document first within your downloads in order to allow its functionality. Please see the video below which demonstrates how to do this, along with the rest of the steps needed to use the template. There are also step-by-step instructions within the first tab of the sheet.
Resolving (Merging) Duplicates
If organisations find they have duplicate profiles the aim should be to remove the duplicate profile from their account to ensure accurate data entry and reporting.
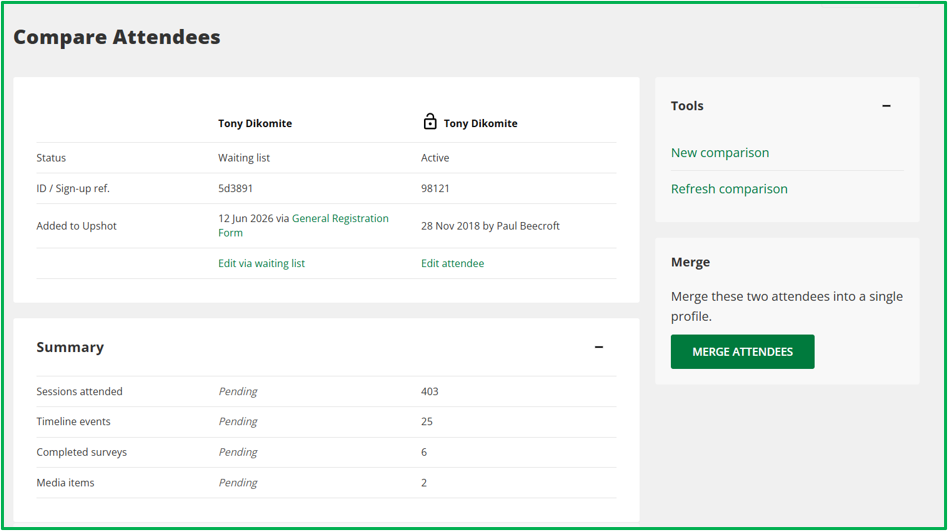
Duplicate attendee profiles can be merged via the Compare Attendees page, which can be accessed by going to People > Compare Attendees or via the Tools section on an existing profile.
Here a user can select two profiles to compare and then merge into one. Merging will involve transferring over existing data on Session attendance, Timeline Events, Surveys and Media onto the profile that is kept. Users can also choose to merge data fields on the profile as well.

Full detail on this process can be found here and we would recommend users read the guidance to understand the process before completing.
Note i: The merging process is not reversible.
Note ii: Only users with the System Admin role can merge attendees.
Note iii: It is only possible to merge attendees when the user has full access to both profiles.
Key Terms
Archiving: