Attendee Sign-up Form - Complete Guide
The Attendee sign-up form is an external registration form which allows attendees to register themselves onto your Upshot database. Multiple forms can be created and sent out via a public form URL or embedded into your website.
Note: In order to access the Attendee Sign-up Form, the main administrator within your organisation will need to contact Upshot to arrange for this free function to be made available on your account. This will also serve as an opportunity to discuss the configuration of the sign-up form.
- Creating your Attendee Sign-up Form
- Terms & Conditions and Privacy Policy
- Success Message and Email Confirmation Message
- Restricting Access to the Attendee sign-up waiting list
- Create Form, Save and Preview
- Activating the Attendee Sign-up form
- Attendee Sign-up waiting list
- Form Link
- Changing / Updating fields within the form
- Frequently Asked Questions (FAQs)
- Key Terms
Creating your Attendee sign-up form
When the Attendee sign-up forms function has been made available, it will sit under Admin.

From the Attendee sign-up forms page, click on Create a new form within the Tools section. You can also choose to copy an existing form.

Organisations may choose to have one Attendee sign-up form or multiple different forms that could be used to tailor your forms to specific audiences such as 'Children / Adult Forms' , 'Referral Forms' , 'Volunteers' or 'Project Specific Forms.'
Once you have clicked Create a new form the screenshot below outlines the interface that you will see.
Give the Attendee sign-up form a Title. If you would like the title displayed on the form tick ‘Display title on form?’
From the Available form fields section on the right hand-side of your screen, use the + button on the relevant field bars to add them into the main body of the form. You can also drag and drop the fields if you wish.
Five fields will be required in all circumstances: First name, Gender, Age, Email address and Attendee Privacy. These are marked with a red asterisk *.
This is in line with either the requirements of Upshot (‘First name’ and ‘Gender’) or by GDPR as standard practice for online forms to ensure organisations meet their requirements as data controllers (‘Age’ and ‘Attendee Privacy’). ‘Age’impacting on who is giving their consent for the attendee to register with your services, whilst ‘Attendee Privacy’ reflects permissions to actions that can be completed with attendees on the system such as photo content or receiving emails from your organisation. Lastly ‘Email address’ is required to ensure organisations have a way of communicating with those that have completed the form in case any elements require clarity.

For any further fields you wish to make mandatory on the form, tick the Required? box.

'Age' and Contact Relationship fields
'Age' is one of the required fields that needs to be added to your Attendee sign-up form and will appear like so for those completing the form.

If individuals indicate they are under 16 (in the above example), through either their D/O/B or not ticking the box shown, then the form will present the following 'Contact relationship fields' which will need to be completed by the appropriate adult (Parent, Guardian, Other) who is giving their consent for the young person being registered.

When creating the form, organisations can set an age of consent between 13 and 18.
The minimum that the 'Age of consent' can be set is 13, meaning that individuals can give their own consent without these additional contact details appearing. This minimum age of 13, is in line with UK GDPR guidance. Organisations may wish to refer to ICO guidance when deciding on the 'Age of consent' for their own form.

Note: 'Contact relationship fields' must be set as, at least, 'Displayed, but not Required' via your Data Display Options.
Without this field set to 'Displayed, but not required' those under the 'Age of consent' you have indicated will not be able to complete the external registration form, as they would not be presented with the contact details section.
Terms & Conditions and Privacy Policy
As a requirement before you deploy the form, you need to outline your terms and conditions which the attendees will then be required to accept before submitting their information. This should clearly outline why you require the information and are collecting it via Upshot. For guidance on compiling your Terms and Conditions, please refer to the link to the Information Commissioner’s Office which can be found below the box for submitting your wording.

Success Message and Confirmation Email Message
Organisations can also create a Success message and an automated Confirmation email message to be sent to attendees after they submit the form.
There is a default Success message provided, however you are given the opportunity to tailor this to your needs.

Below is an example of how the Confirmation email message looks and also how this appears to the participant once received.


Note: Confirmation email messages will not be sent if this field remains blank.
Individuals that complete the form will receive an automated signup reference via both the Success Message and the Confirmation Email Message if being used.
Restricting Access to the Attendee sign-up waiting list
Finally, it is also possible to restrict the Users that have access to the responses of a particular Attendee sign-up form when these responses are on the Attendee sign-up waiting list..
This functionality is optional, but can be helpful in instances where only certain users should manage the waiting list, or help provide clarity for users when the organisation is using multiple Attendee sign-up forms and the waiting list becomes busy.
At the bottom of the screen the option to restrict access to the waiting list is presented. Add the users who should see responses to this form on the waiting list. Ensure SAVE is clicked at the top of the page. Any users not selected will no longer see responses on the waiting list for this form.
If no option is selected, which is the default, all users that hold roles with access to personal details will be able to see the responses on the waiting list for that Attendee sign-up form.

Note: Once attendees have been 'Accepted' off the waiting list and added to the system all users will be able to interact with them and no restrictions are in place unless features such as Restricted Attendee Profiles are applied.
Create Form, Save and Preview

CREATE FORM: Click the Create Form button either if you wish to return to the page and make more changes, or if you are planning to begin the process of deploying the form.
Once the form has been created, further options will appear.
SAVE: To save any changes made to the attendee sign up form, click the Save button.
DELETE FORM: Click the Delete Form button to remove the form from Upshot. Note this cannot be reversed. The Delete Form option will only be available if the attendee sign-up form has not had any submissions.
Activating the Attendee sign-up form

Anyone who clicks on a public URL for an Attendee sign-up form that has been made Inactive will not be able to view or submit a new form and will instead see the following message on screen.

If you later decide to make the form Active again, the URL stays the same.
Attendee sign-up waiting list
Completed forms can be found on the Attendee sign-up waiting list which sits under the People tab.
Users will see an icon with the number of outstanding Attendee sign-ups. This will only include sign-ups from forms the user has access to. It is also possible to receive email notifications when there have been form submissions, more detail can be found here.


Note: For more information on potential duplicates please view the guide here.
Note: It is possible to restrict user access to the Attendee sign-up waiting list responses for individual forms, more detail on this can be found here.
If all required fields are complete you can click ACCEPT to add the attendee to your account.
Use the Sign-up form filter within the Tools section to view the attendees who have signed up using specific forms.
You can also view forms by clicking on the sign-up form name. If you are unable to click on a form, this will indicate the Attendee sign-up form has been made inactive.
The Audit log can be used to review a full history of accepted/rejected forms that have passed through the waiting list.


Users can also later identify those attendees that have been added to the system via the Attendee sign-up form function. This information would be found on the 'Summary' on an attendees profile or in a export of the People Report under the column titled Added via.
Sign-up reference
When completing the form individuals will receive an automated sign-up reference. The sign-up reference can firstly be helpful if an organisation is contacted by someone that completed the form and they still sit within your Attendee sign-up waiting list.
For any attendees that have been 'Accepted' onto the system, the sign-up reference can be used in the search bar to find the relevant attendee.
Notifications
Users can be notified that there have been new sign-ups to Attendee sign-up forms in one of two ways:
- On Screen notification
- Email notification
On Screen Notification
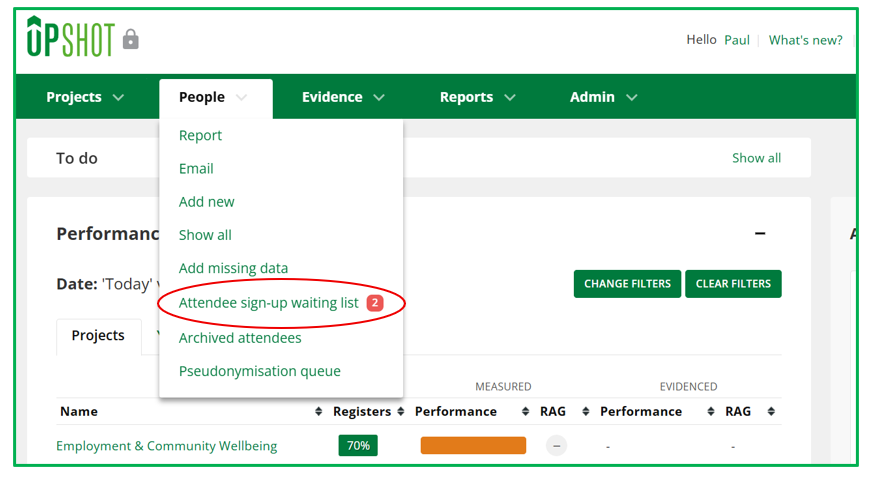
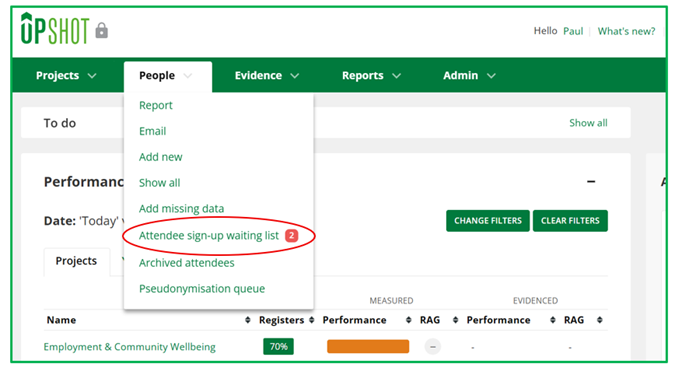
When hovering over the People tab the Attendee sign-up waiting list (link) will show a red icon to indicate the number of profiles on the waiting list:
Email notification
Users can choose to receive email notifications when there have been sign-ups to their Attendee sign-up forms.
The email received will look like the below:

Users will see the detail on the number new of sign-ups, for forms and a link to be taken to the Attendee sign-up waiting list.
Subscribing to email notifications for certain forms can be managed in one of two ways:
- Users can click on their name in the top-right hand corner, under Your Account and click on the Notifications tab.
- System Admins can set the users to receive email notifications on the configuration page for an Attendee sign-up form. This can be done by going to:
- Admin > Attendee sign-up forms.
- Clicking Manage on the relevant form.
- At the bottom of the page in the drop-down selecting the Users subscribed to email notifications.
- Click SAVE towards the top of the page.
It is possible for users to select a preference for how frequently they would like to receive these email notifications.
By following the steps in point 1 above users will see the option to set the Email notification frequency:
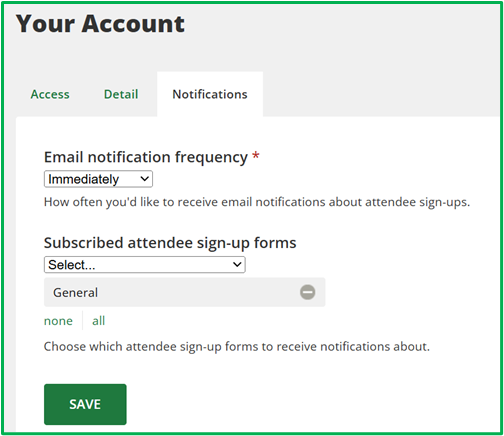
This allows the user to set their email notifications either ‘Immediately’, when someone has submitted the form, or to have these batched and receive an email at a different period if there have been new sign-ups.
'Batching' works by grouping message into 24 hour buckets, so if set at 'Every 24 hours' you would expect to get an email at 9am if there were any notification in the previous 24 hour period, i.e. (so a notification at 8am might get batched into a 9am email one hour later).
For 12 hours, it happens at 9am and 9pm. For 6 hours, it happens at 9am, 3pm, 9pm, 3am. For 3 hours, it happens at 9am, 12pm, 3pm, 6pm, 9pm, 12am, 3am, 6am.
System Admins can also amend this frequency for other users from Admin > Show all users and clicking update on the relevant user.
Note: Users will only be able to receive or set notifications for responses to forms where they have access to the waiting list.
Form Link
The form links will only show if the Attendee sign-up form is set to 'Active' for your organisation. This is set at the top of the form builder page, which can only be accessed by System Admins, via 'Admin > Attendee sign-up':

Public form URL
The Public form URL link can be accessed from the form builder page by System Admins as described above.
All users can access the full list of forms created by an organisation from one of two places:
1. From the Attendee sign-up waiting list (People > Attendee sign-up waiting list). Under Tools on the right-hand side click on Attendee sign-up forms.
2. From the Home Page on the right-hand side under Tools click on Attendee sign-up forms.
Once on the form in either of the above two options the URL link can then be copied and distributed as needed.
Embeddable form URL
The Embeddable form URL link will be shown at the top of the form builder page and can be accessed by System Admins by going to Admin > Attendee sign-up.
The process to embed the form within your existing website will vary dependent on the website hosting tool used. The below additional guidance that might prove helpful when looking to .embed the sign up form on your website.
---------------------
Most CMS’s will have an embed feature, but it’s essentially using the following code with the width, height, title, frameborder and scrolling variables customised to fit in with the site:
<iframe src="https://beta.upshot.org.uk/signup/5de61edc/embed/" width="950" title="" height="1200" frameborder="0" scrolling="no">
------------------------
With the 'beta' link being replaced by your actual Upshot embeddable form link.
Changing / Updating fields within the form
If organisations need to add new fields to the form or change the wording of any of their custom fields already within the form this needs to be managed by going to Admin > Attendee data fields.
Add or update your fields here and then go to Admin > Attendee sign up to make sure these changes are reflected within the Attendee sign up form.
- New custom attendee data fields - These will be presented on the right-hand side under Available form fields and users need to drag and drop these fields into the relevant order of their form on the left hand side. At the top of the form users should then click Save.
- Renaming of existing fields - If a field has been amended, in terms of either a rewording of the 'label' or a change to the help text, this will automatically reflect in the Attendee sign-up form.
- Existing fields set to not displayed - If a previously used field has been sent to 'Not displayed' and had also previously been used in the organisation's Attendee sign-up form, the organisation will see it listed in the form builder page with the following message:

As the message states, the field is no longer being displayed. Organisation's might find it helpful to remove this field from the list on the left-hand side to get a more accurate impression of what is currently being displayed. This can be done by clicking the cross highlighted above and then at the top of the form clicking Save.
Note: Any amendments to the external Attendee sign-up form will not alter the URL link for the form itself, ensuring that if the link has been shared previously it will still be relevant and the same one to use.
Frequently Asked Questions (FAQs)
Please click here to see some commonly asked questions about the Attendee sign-up form feature.