Timeline Events - Complete Guide
Upshot allows you to track anything that has happened or changed with your attendees using Timeline Events. This can help you to record the work you complete with participants outside of sessional data and can help to record their progress/journey while using your services. These can be positive or negative and can be used to help build case studies.
Examples of this could include tracking accreditations or qualifications gained by individuals or recording if attendees have been referred or signposted to other organisations/services. Other organisations might use this to record if attendees have gone back into employment/education or use this feature as a place to store narrative from 1:1 conversations with attendees with the ability to restrict access.
- Adding Timeline Events to an Attendee
- Restricted Access to Timeline Events
- Adding Timeline Events from a Session Register
- Attendees Timeline
- Reporting on Timeline Events
- Customising your Timeline Event Options
- Webinar
- Key Terms
Adding Timeline Events to an Attendee
To view an attendee’s profile, simply type their name in the search bar at the top right of the page and click on their name when it appears. Alternatively click on the attendee’s name within a register.

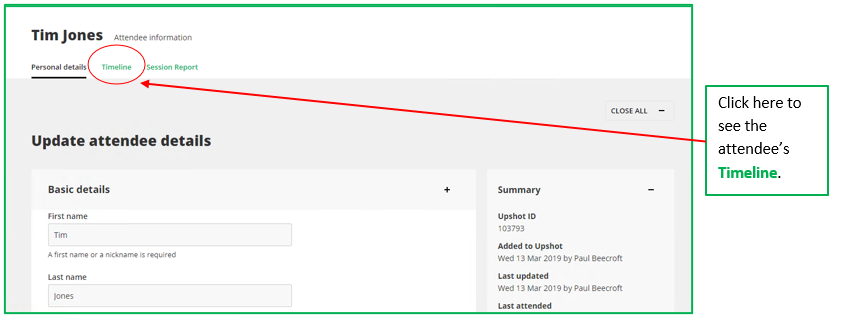
When viewing an attendee’s profile, you can see their timeline by clicking on Timeline.
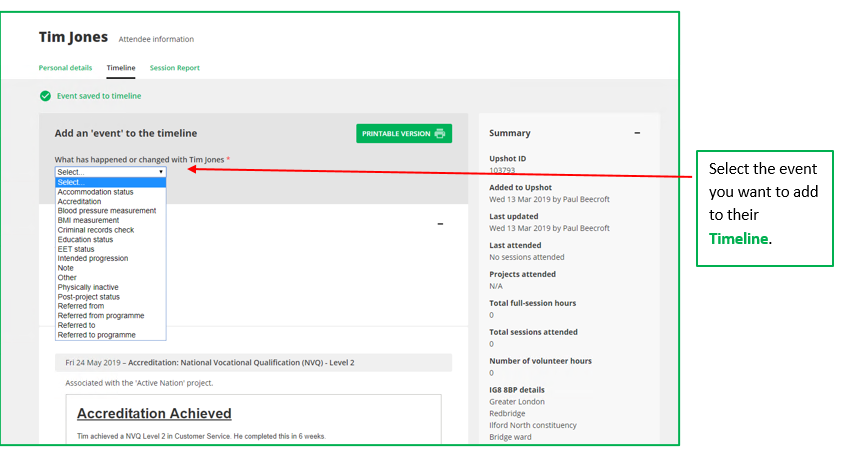
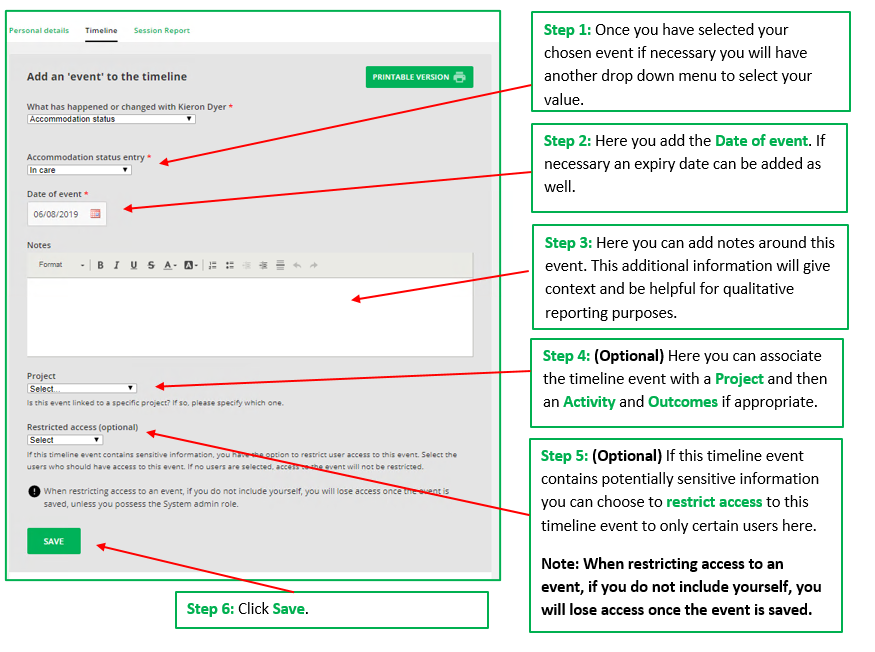
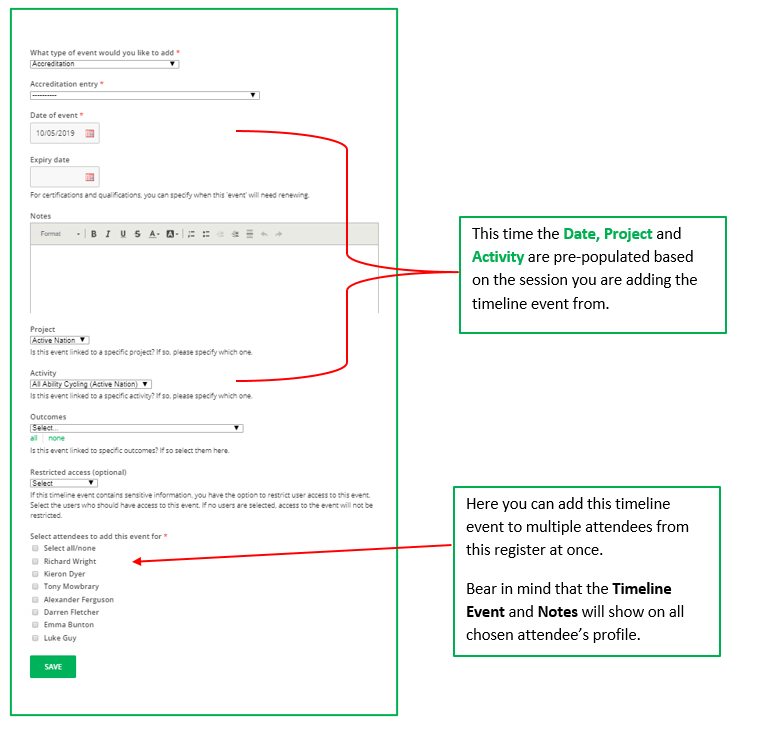
The timeline event example on the next page shows that for Accreditations, you can specify the accreditation they have achieved, the day they achieved it and the expiry date (if necessary). You can also add notes to the event. These additional notes can give context and detail and are really helpful when building up this case study for an individual. There are a variety of formatting options allowing you to highlight different parts of the text.
You can also choose to associate the timeline events with a specific project, activity and/or outcome if relevant for reporting purposes.
Restricted Access to Timeline Events
Access to individual timeline events can be restricted if required. This may be useful if the timeline event contains potentially sensitive data such as Case Notes that are taken from a 1:1 counselling session for example.

Adding Timeline Events from a Session Register
You can also add timeline events from a session for individuals or multiple attendees. This can be done from a session register.

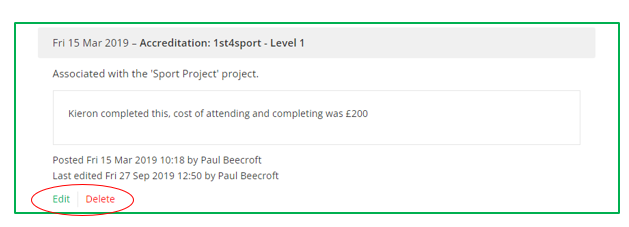
Editing can include editing the detail of the event itself, or any of the relevant associations (Project, Activity, Outcomes) and restrictions.
Note: When adding Timeline Events directly from a session register, the Outcomes available will only be those associated to the Activity the session belongs to.
Attendees Timeline
An attendee’s timeline will also show any Media they are associated with and Surveys they have completed.
Alternatively, users may only be interested in anything added to the attendees timeline within a specific date range.
A Printable Version of this page is also available that could be used internally, or shared with the attendee, whilst there is also a quick link to the Timeline Events Report if the user would like to report on details of the events across several attendees.

Reporting on Timeline Events
Reporting on Timeline Events can be done in four ways.
People Report

Then click Go.
In general, if you want to download all the Timeline Event information the Timeline Events Report listed below is a better way to do this.
Timeline Events Report
This has two elements, viewing the report on screen and downloading the information around your Timeline Events.
Viewing the Report 'on Screen'
Use the Timeline Events Report to find either the number of times a certain Timeline Event has been recorded or the number of attendees who have this Timeline Event recorded against their profile.

For event types that are Single-choice drop down, Multiple-choice field, A number or Yes/No you will have the option to expand this by clicking on the + on the right-hand side to see a breakdown for relevant values underneath.

Use the filters on the right-hand side to narrow down your report to Timeline Events recorded within a certain time period, associated to certain Projects/Activities or your Outcomes.
Downloading the Report
Users also have the option to export their Timeline Event information using this report. They can either select to Download or Download via Email.
This allows the user to see the detail of the Timeline Events, such as the associated 'Projects, Activities, Outcomes and the Recording user', as well as enabling users to carry out more complex reporting if desired.
Note:
(i) Users can choose to ‘include attendee personal details’ when using the ‘Download via email’ option.
(ii) Users will be restricted to the ‘Download via email’ if their file contains more than 10,000 'items' (Timeline events x unique attendees)
Users are encouraged to use the filters available on the right-hand side before downloading, to make the exported information as relevant as possible. For instance, selecting filters related to a ‘Date Range, Event Type(s), Project(s) or Strategies/Outcomes.’
Users can also report on Timeline Events via the People and Attendee Reports, to find out more click here.
The export will contain five tabs:
- Info
- Raw - Attendee and event type
- By attendee and event type
- Raw - Outcomes
- By outcome
Info
This will detail key criteria of the report, such as the date generated and any filters selected. It will also highlight key rules around how the Timeline Event data is presented across the export, in relation to things such as Restricted Timeline Events and Restricted Attendee Profiles.
Raw – Attendee and event type
This lists each individual instance of a Timeline Event on a separate row and contains all associated information about this apart from outcomes. For Multiple-choice field type events, if used, the 'Event value' will show multiple selections separated by a vertical bar.
Using the filters at the top of this tab can allow users to focus on Timeline Events added to a certain attendee or by a certain user as well as other areas that may be of interest.

By attendee and event type
This groups the Timeline Event information for each of the attendees in the download, presenting a succinct format that lists their name, the 'Event type', 'Event value' and 'Total timeline' events for that attendee.

Raw - Outcomes
This provides the same information for each outcome as the 'Raw – Attendee and event type' tab, with the addition of the associated outcomes. A Timeline Event is repeated on multiple rows if it is associated to more than one outcome and/or is a multiple-choice field type of event.
E.g. if a Timeline Event is connected to three outcomes, the event will be repeated on three rows. The rows will be identical apart from the three different outcomes associated to the event.
Again, using the filters at the top of this tab of the report can allow users to focus on particular areas that may be of interest.
By outcome
This tab groups the Timeline Event information in relation to each outcome. This allows users to see the instances of Timeline Events that relate to specific outcomes and some key information around them, as well as the Total amount of Timeline Events linked to that outcome.

For any instances of Timeline Events that were not connected to any outcomes, they will be grouped under 'No outcomes associated.'
Facilitating Organisation (FO) - Additional Rules
Facilitating Organisation users will only have this option to download the report if they have ‘full access’ to associated Delivery Organisations connected to their account.
If they do, there is also additional criteria presented on screen and below that they need to be aware of detailing what information is presented in their download:
- The download will only contain Timeline Event information of those attendees that have attended programmes which the user has access to, and are connected to your Facilitating Organisation.
- Only attendees from Delivery Organisations that your Facilitating Organisation has full access to will show in the download. E.g. if some connected Delivery Organisations are ‘exempt’ from sharing full information, they will not be included in the download.
- The download will contain both Global and Facilitating Organisation custom Timeline Event information. It will not contain information on any Delivery Organisation custom Timeline Events. It will also not contain any Timeline Events associated with ‘private projects’ at the Delivery Organisation level.
Reporting Template - Reporting by 'Recording User'
Finally, organisation's can also use a pre-built Reporting Template to report by user in relation to Timeline Events. By copying data from a Timeline Event Report export into the pre-built Reporting Template organisations can quickly see key stats around the amount and type of Timeline Events recorded by each Upshot user, as well as the link between the user and attendees in terms of Timeline Events.
To access and find out more around the reporting template, please click here.
Attendee Report
You can also see a specific Attendee’s Timeline events by downloading an Attendee Report.
Measured Indicators

Note: For the Measured Indicator performance to include Timeline Events added to attendee profiles, the Timeline Event, when added, must be associated back to the relevant project the indicator is created in. Timeline Events not linked back to the project will not show in your indicator results.

Customising your Timeline Event Options
Webinar
As part of the Upshot Community Webinar series in 2020 a thirty minute webinar was delivered called Participant Journeys with Upshot's Timeline Events feature and this can be seen below:
Chapters
05:50 - Adding Timeline Events to attendees
19:02 - Adding a new Type of Timeline Event
21:05 - Hiding Timeline Event types
22:30 - Managing user access to existing restricted Timeline Events
24:25 - Reporting on Timeline Events
Since the recording of this webinar there have been further improvements to the Timeline Events Report, allowing users to export the data on multiple timeline events at once and view all associated data. The export will contain information such as the associated 'Projects, Activities, Outcomes and the Recording user' for each Timeline Event entry, which can be used for custom reporting as well as having inbuilt 'filters' and 'groupings' on the different tabs to aid users.
Key Terms
Timeline Event: